 jerry
jerry
Playing with ChatGPT
Links and Info:
to get a chatGPT account – go to https://chat.openai.com
https://platform.openai.com/docs/introduction
https://platform.openai.com/examples/default-sql-request
https://platform.openai.com/examples/default-qa
https://platform.openai.com/docs/quickstart/start-with-an-instruction
https://platform.openai.com/account/api-keys
https://platform.openai.com/docs/guides/images/usage
Windows 10 God Mode
If you are a long-time Windows fan and user, you might remember something called “God Mode” hidden in within Windows’ files. In essence, God Mode in Windows gives you access to the operating system’s control panel settings from within one folder. The real name for God Mode in Windows is Windows Master Control Panel shortcut. Enabling God Mode in Windows 10 is much easier than it sounds.
God Mode is most helpful for advanced Windows users that work in IT; as well as more advanced Windows enthusiasts. Most customers, like myself, will not see a use for having God Mode enabled in Windows 10, it’s like having your developer settings enabled on your smartphone. If you want to try it out, though, here’s how to enter God Mode in Windows 10.
How to enter God Mode in Windows 10
- Make sure your Microsoft system account has administrator privileges.
- Right-click on the Windows 10 desktop and “Create a new folder.”
- Right-click the the new folder and rename the folder: “GodMode.{ED7BA470-8E54-465E-825C-99712043E01C}” press enter and you’re all set!
If you want, you can change the folder name, “GodMode,” at the beginning of the renamed file folder. Now, when you open the folder, you will see various settings that you can change at will. You can see around 30 different settings available, including Devices and Printers, Administrator Tools, etc.
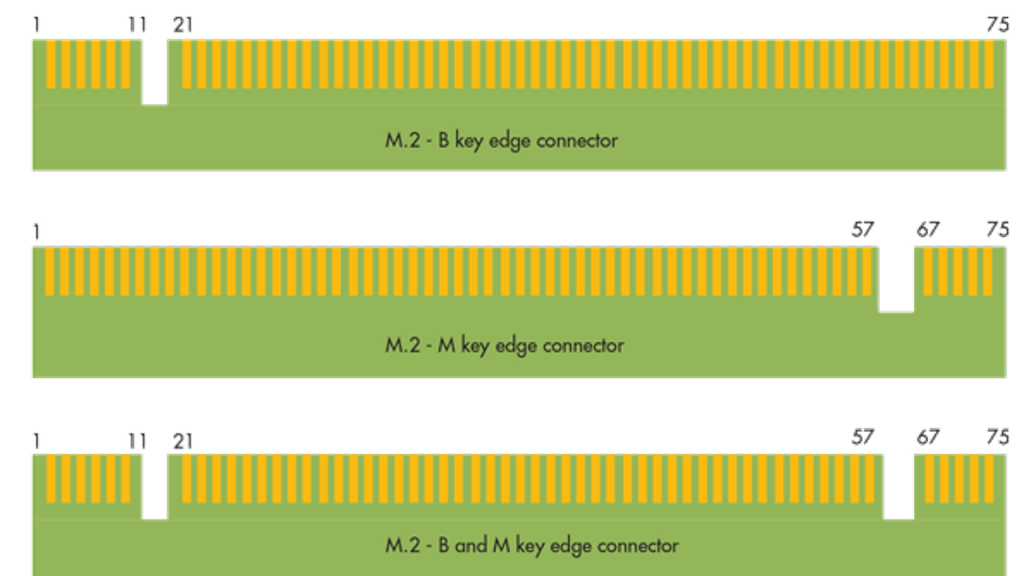
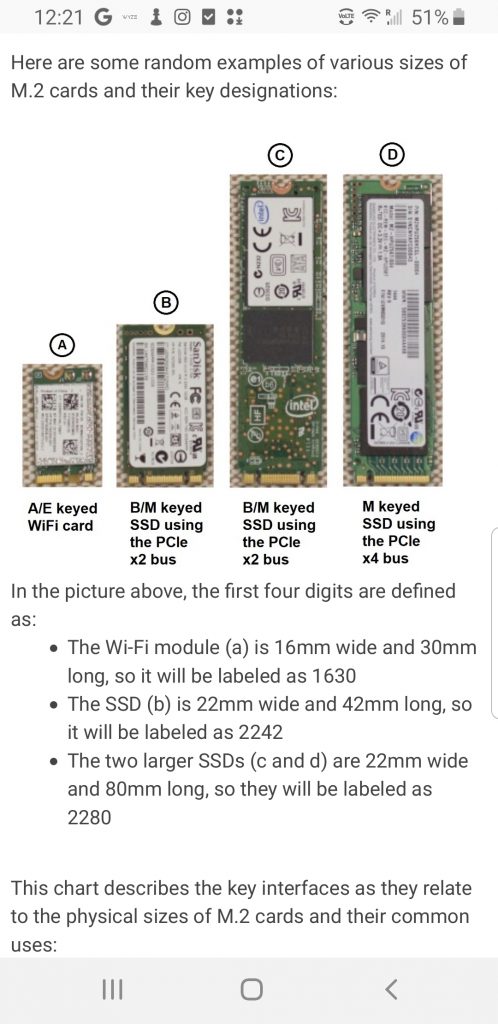
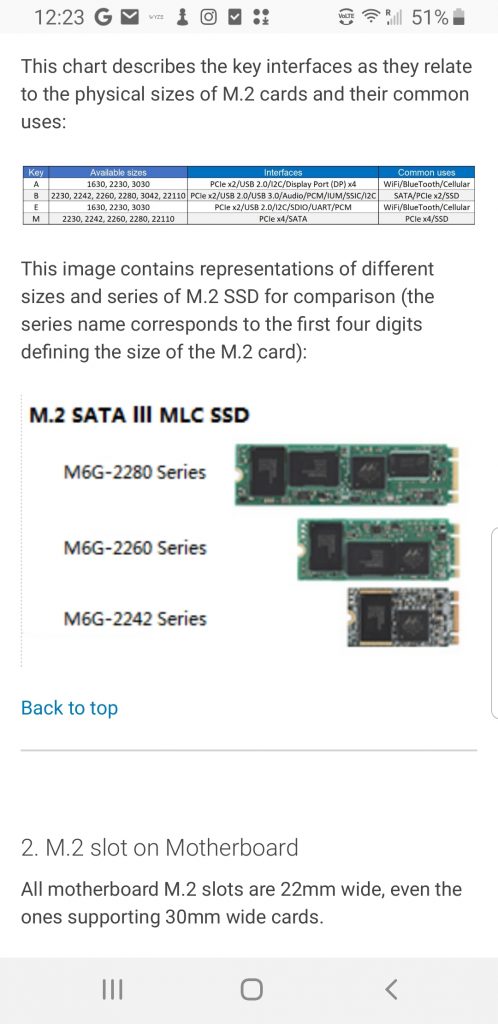
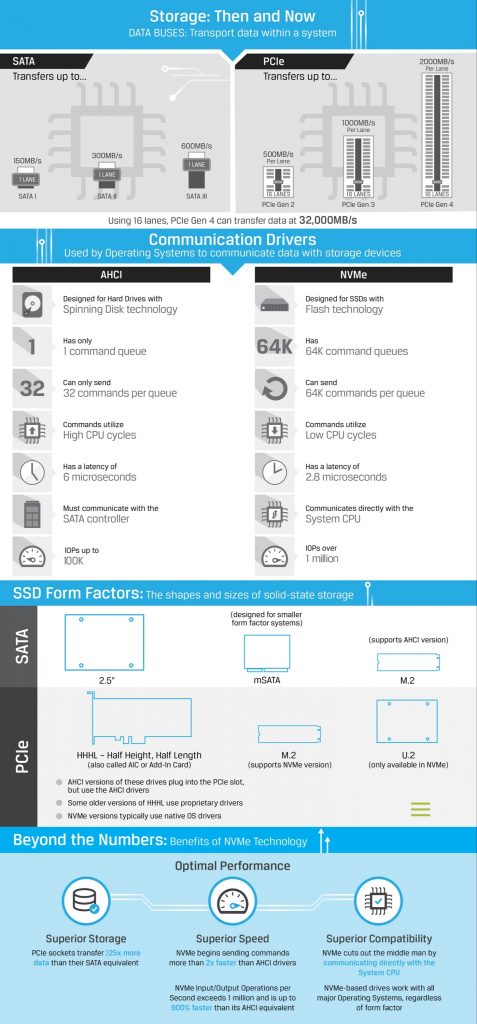
M.2 SSD Cards
What is the difference between M.2 modules – see here https://www.electronicdesign.com/technologies/memory/article/21801513/whats-the-difference-between-m2-modules
How to distinguish the differences between M.2 cards – https://www.dell.com/support/article/en-us/sln301626/how-to-distinguish-the-differences-between-m-2-cards?lang=en
Once you determine the proper SSD card, check out the benchmarks at https://ssd.userbenchmark.com/
HP Elitebook 840
I recently had the opportunity to work with 30 HP Elitebook 840 G1 & G2 laptops. The drives were wiped and the laptops donated to a non-profit group. Originally we were going to use these laptops to help groups register for the 2020 census. Then came the lock down with the Corona-virus.
We thought we did not have the Windows keys for these machines, so the open source operating system Ubuntu was installed using a boot USB drive (described here). After installing Ubuntu in about 15 computers, I had a problem and opened up the back case and removed the battery and found the windows 7 key.
These Laptops came with a i5 Intel Processor, 8GB Ram, 500 GB Hard Deive and Windows 7. Once windows 10 was installed, it was a rather robust computer. But when I took off the back case, I found a slot for a SSD Card and decided to try installing the card and using it as the boot drive. I purchased a 128 GB 2242 Sata3 SSD Card (what SSD Cards work in these laptops – more later).
Installing a SSD Card
For this 1st laptop, a HP Elitebook 840 G1 I purchased this SSD Card.

Which went into this slot –
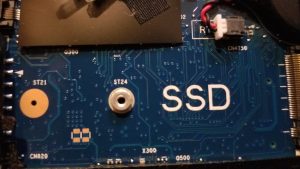
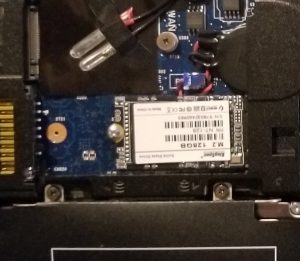
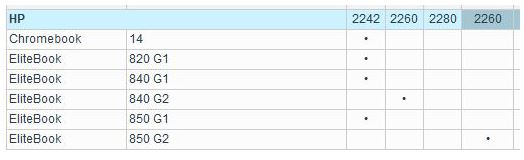
To install the card go in at an angle and slide in the connectors. Then lower the back end and install the securing screw. At this time we should warn you that all the G1 laptops took a 2242 profile card, the G2 took a 2242 or a 2260 profile, it depends where the screw slot is located.


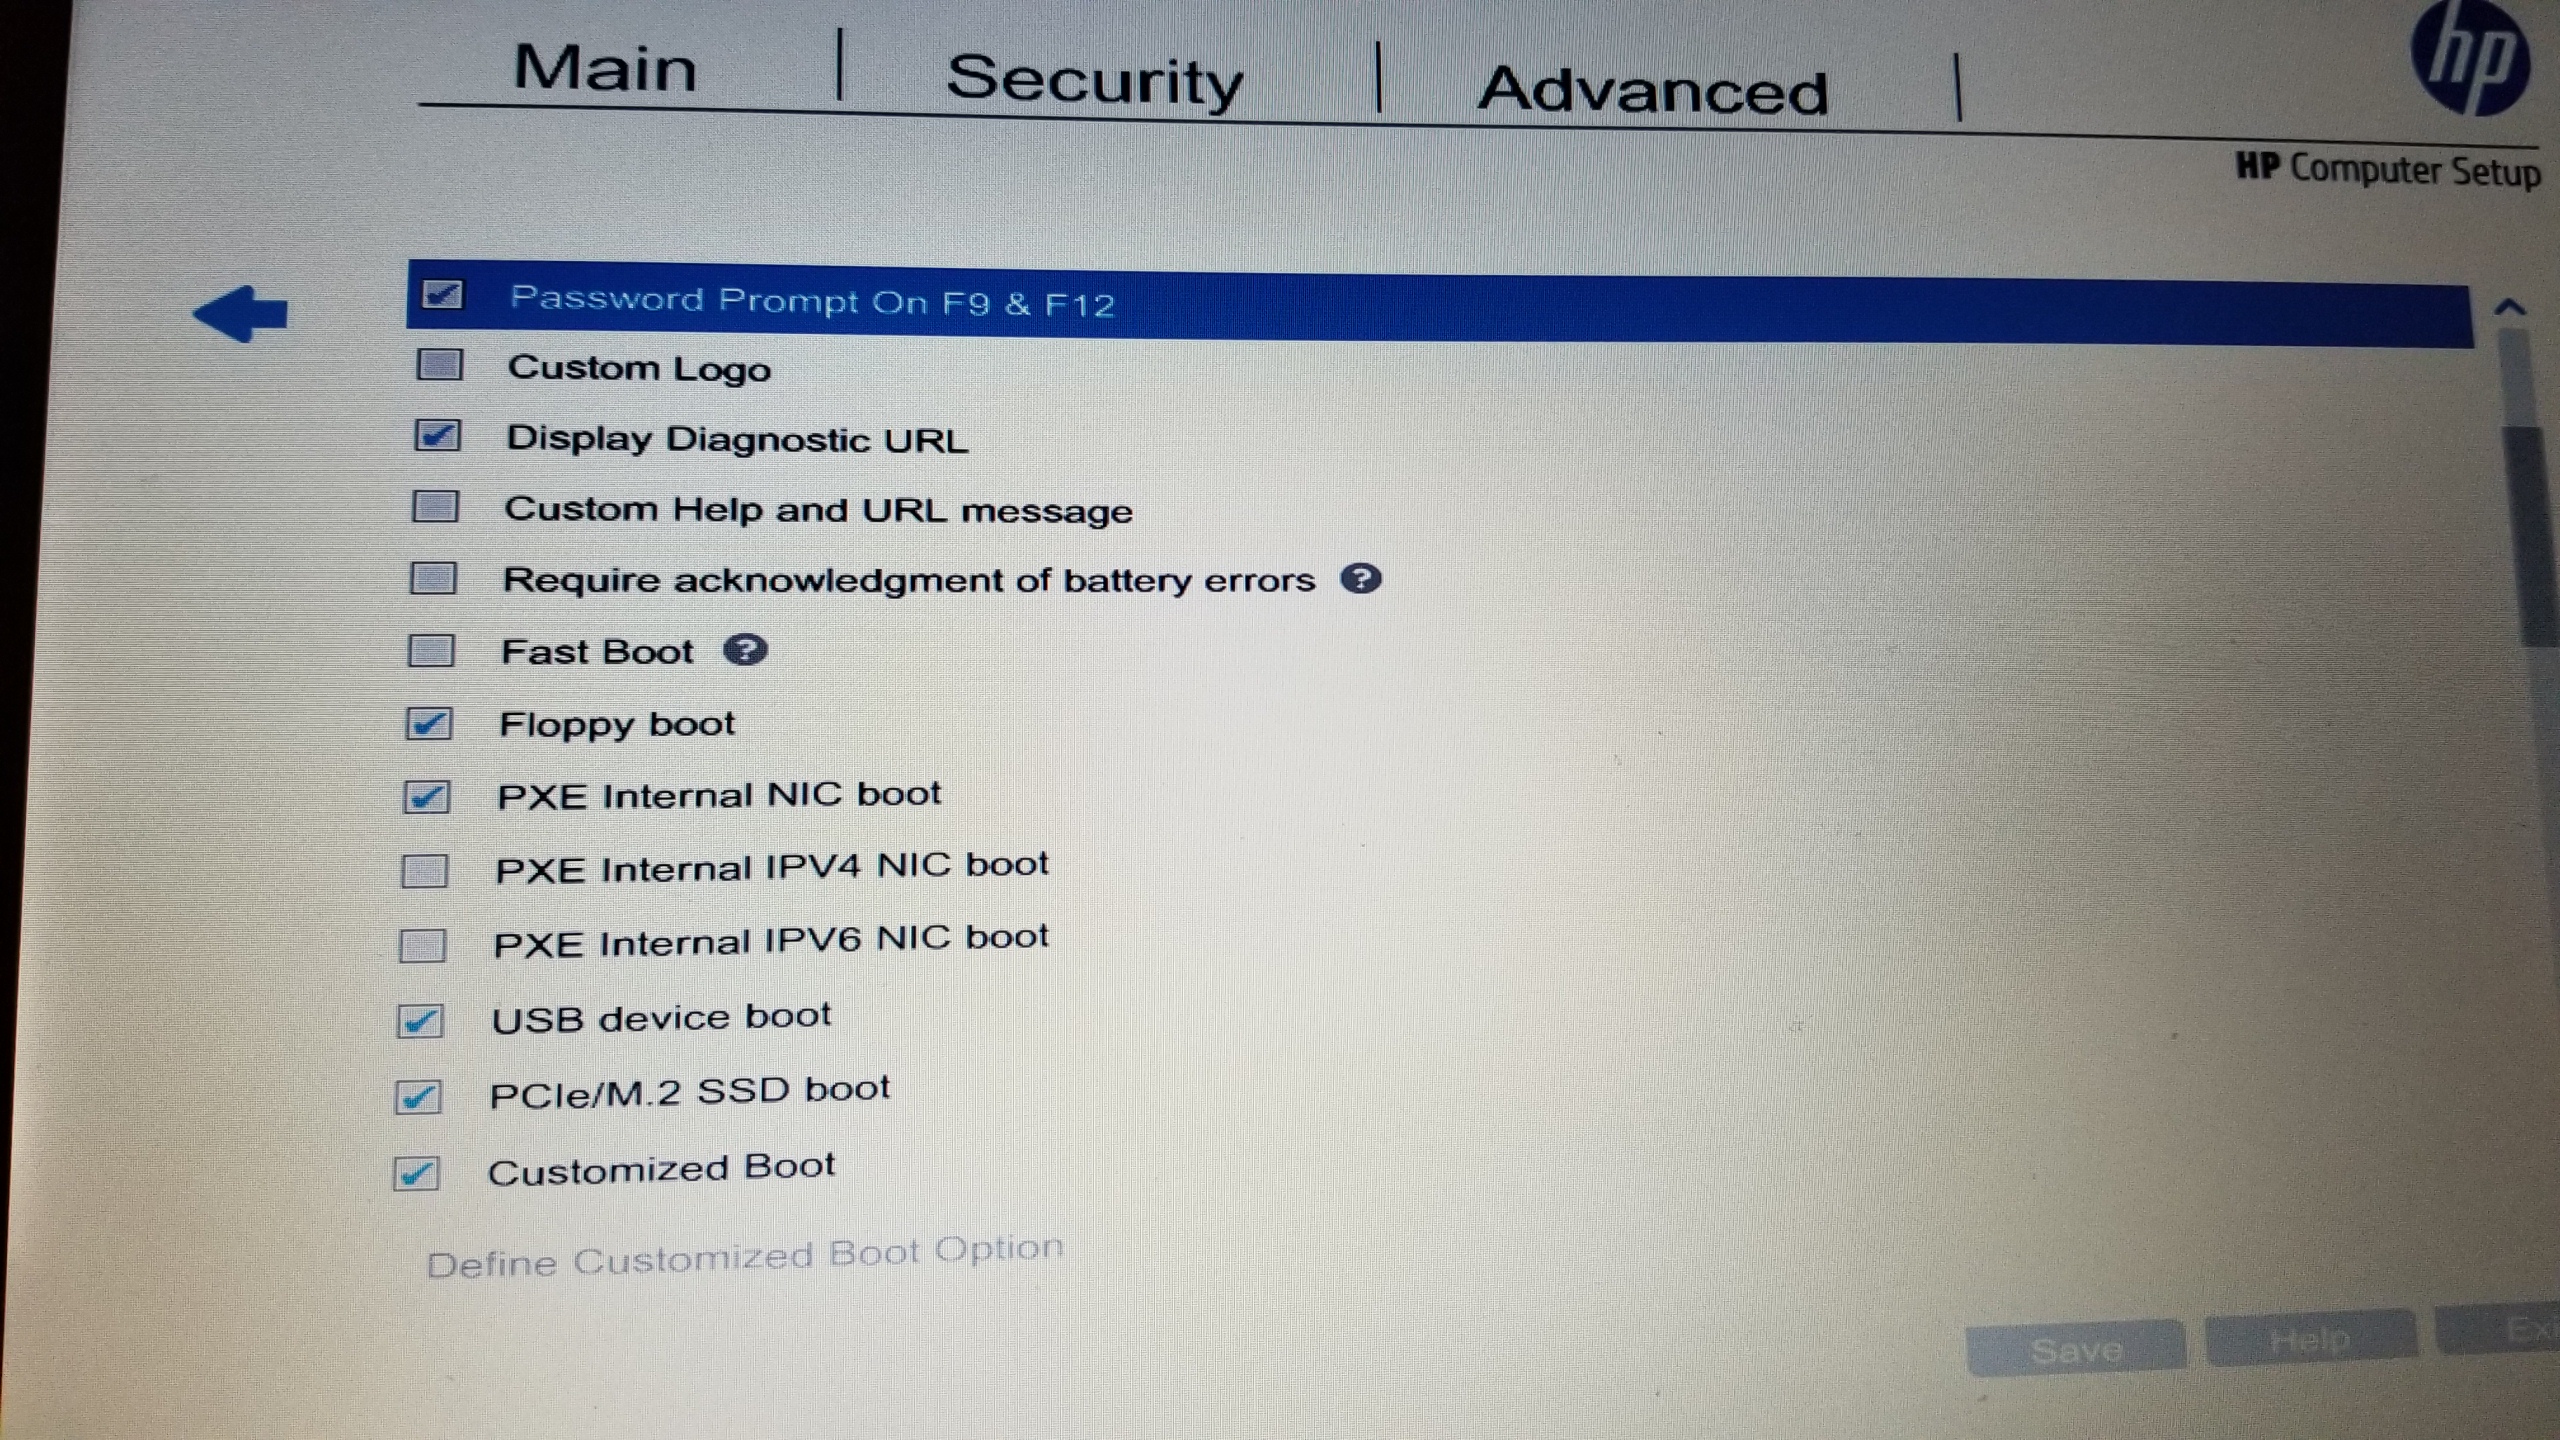
Once you install the correct card, then close up the case and boot to the Bios (press escape “esc” key once on startup) then select f10 to go to the bios and ensure the M.2 slot is enabled.
Save the changes in bios and shut down. Now plug in your USB boot drive with windows 10 and boot up using the USB drive. So on startup Hit F9 to select boot menu (or hit the escape key & see the full bios menu).. On the Boot menu you will see the M2 SSD drive at the top of the boot order and go to USB drive and boot up to install windows.
Boot USB Drive
Ubuntu version 18.04 bootable USB drive (download zip file now 4.1GB) – this can be used to install Ubuntu on any computer – download and unzip to root of USB Drive and boot to usb drive.
You may also make a bootable Windows 10 USB drive using a windows 10 image file. Any windows key may be used including windows 7 to upgrade your computer to a windows 10 machine. Or use the Windows 10 USB bootable drive zip file – (download now 3.7GB)
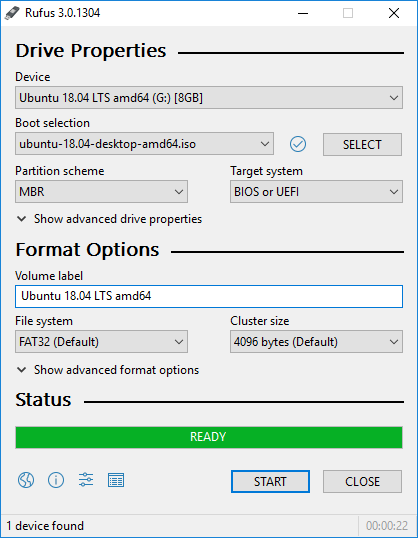
Using your own iso file – create your own bootable usb drive using Rufus (download Portable version now 1.2Mb ) – extract the zip file and run rufus without installing.
Rufus is a utility that helps format and create bootable USB flash drives – web site
If you wish to install windows 10 on your Mac Computer, see this Website.
Wed Development Application Demos
Have you ever wondered what all those web development applications are about?
See the descriptions and demos of 449 of the most popular apps at http://www.softaculous.com/apps
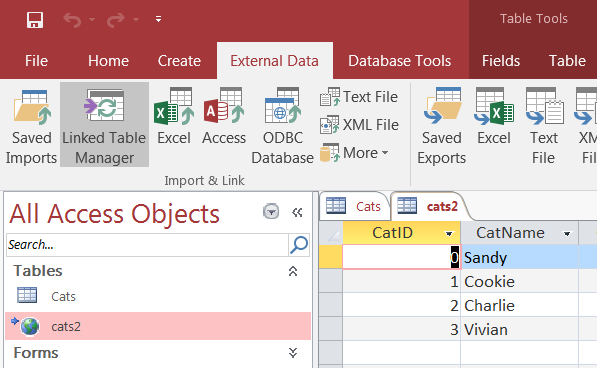
Using Microsoft Access as a Front-end to MySQL
You can use Microsoft Access as a front end to MySQL by linking tables within your Microsoft Access database to tables that exist within your MySQL database. When a query is requested on a table within Access, ODBC is used to execute the queries on the MySQL database.
To create a linked table:
- Open the Access database that you want to link to MySQL.
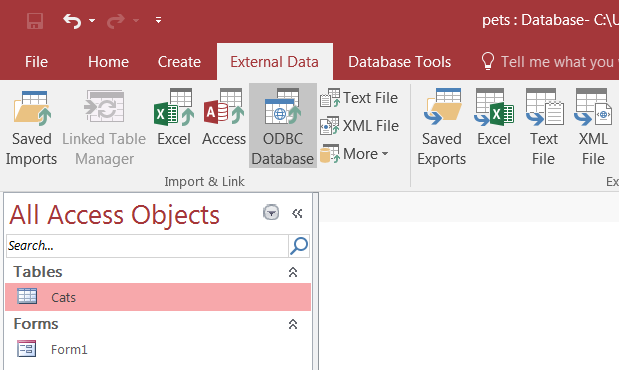
- On the tab, choose .
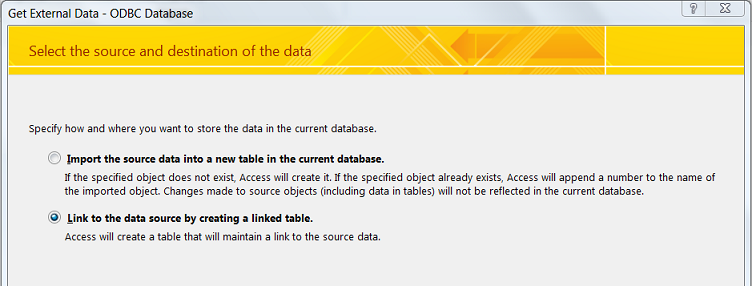
- In the
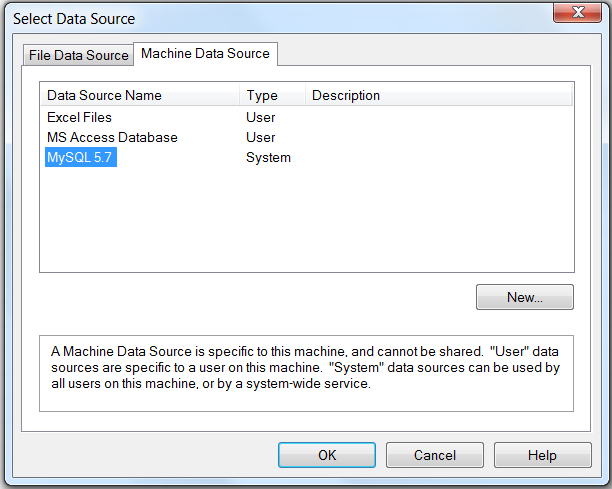
Get External Datadialog box that appears, choose Link to the data source by creating a linked table and click . - The Select Data Source dialog box appears; it lists the defined data sources for any ODBC drivers installed on your computer. Click either the File Data Source or Machine Data Source tab, and then double-click the Connector/ODBC DSN you want to link your table to. To define a new DSN for Connector/ODBC instead, click and follow the instructions in Section 5.3, “Configuring a Connector/ODBC DSN on Windows”; double click the new DSN after it has been created.
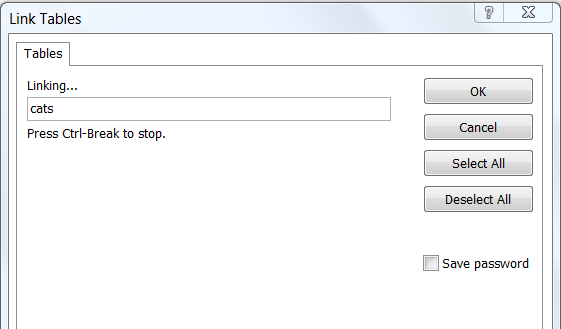
If the ODBC data source that you selected requires you to log in, enter your login ID and password (additional information might also be required), and then click . - Microsoft Access connects to the MySQL server and displays the list of tables that you can link to. Choose the tables you want to link to (or click ), and then click .
Notes
- If no tables show up for you to select, it might be because you did not choose the to connect to when you defined or logged in to the DSN. Reconfigure the DSN and specify the Database to connect to (see Section 5.3, “Configuring a Connector/ODBC DSN on Windows” for details), or choose a Database when you log in to the DSN.
- If your database on Access already has a table with the same name as the one you are linking to, Access will append a number to the name of the new linked table.
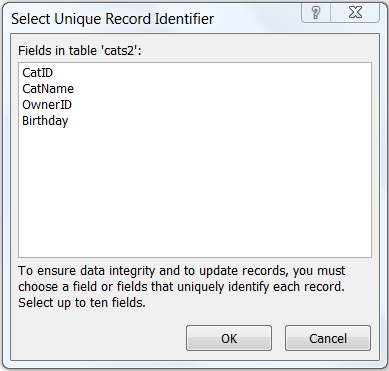
- If Microsoft Access is unable to determine the unique record identifier for a table automatically, it will ask you to choose a column (or a combination of columns) to be used to uniquely identify each row from the source table. Select the column[s] to use and click .
Once the process has been completed, you can build interfaces and queries to the linked tables just as you would for any Access database.
Use the following procedure to view links or to refresh them when the structures of the linked tables have changed.
To view or refresh links:
- Open the database that contains links to MySQL tables.
- On the tab, choose .
- The Linked Table Manager appears. Select the check box for the tables whose links you want to refresh. Click to refresh the links.
If the ODBC data source requires you to log in, enter your login ID and password (additional information might also be required), and then click .

Microsoft Access confirms a successful refresh or, if the tables are not found, returns an error message, in which case you should update the links with the steps below.
To change the path for a set of linked tables (for pictures of the GUI dialog boxes involved, see the instructions above for linking tables and refreshing links) :
- Open the database that contains the linked tables.
- On the tab, choose .
- In the that appears, select the Always Prompt For A New Location check box.
- Select the check box for the tables whose links you want to change, and then click .
- The Select Data Source dialog box appears. Select the new DSN and database with it.
Python
Installed python on my windows machine and seems to work fine –
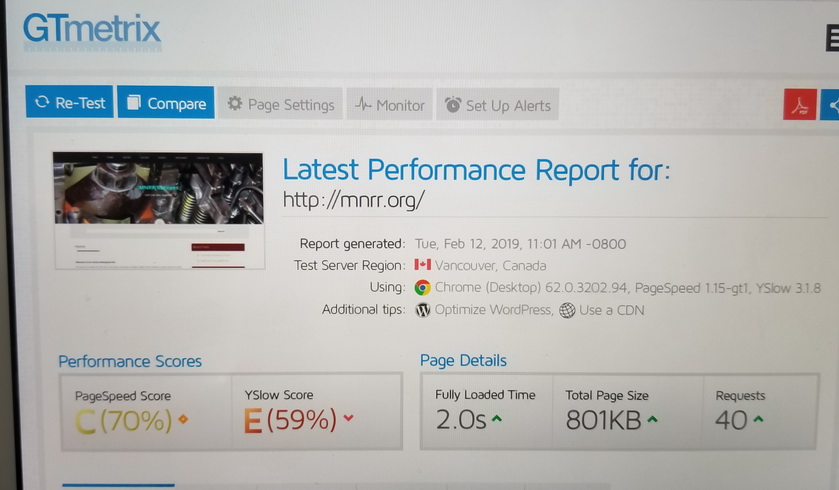
WordPress site speedup with compression added code to .htaccess file.
I had a slow Gtmetrix reading on the speed of my website. used htaccess file to compress my files on the server – see https://kinsta.com/knowledgebase/enable-gzip-compression/
added code to my htaccess file and see the difference

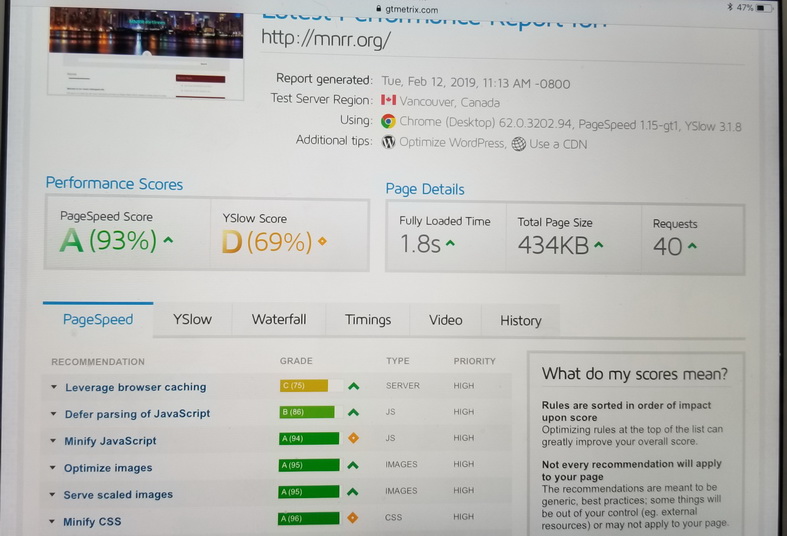
.htaccess code added at bottom of file:
<IfModule mod_deflate.c>
# Compress HTML, CSS, JavaScript, Text, XML and fonts
AddOutputFilterByType DEFLATE application/javascript
AddOutputFilterByType DEFLATE application/rss+xml
AddOutputFilterByType DEFLATE application/vnd.ms-fontobject
AddOutputFilterByType DEFLATE application/x-font
AddOutputFilterByType DEFLATE application/x-font-opentype
AddOutputFilterByType DEFLATE application/x-font-otf
AddOutputFilterByType DEFLATE application/x-font-truetype
AddOutputFilterByType DEFLATE application/x-font-ttf
AddOutputFilterByType DEFLATE application/x-javascript
AddOutputFilterByType DEFLATE application/xhtml+xml
AddOutputFilterByType DEFLATE application/xml
AddOutputFilterByType DEFLATE font/opentype
AddOutputFilterByType DEFLATE font/otf
AddOutputFilterByType DEFLATE font/ttf
AddOutputFilterByType DEFLATE image/svg+xml
AddOutputFilterByType DEFLATE image/x-icon
AddOutputFilterByType DEFLATE text/css
AddOutputFilterByType DEFLATE text/html
AddOutputFilterByType DEFLATE text/javascript
AddOutputFilterByType DEFLATE text/plain
AddOutputFilterByType DEFLATE text/xml
# Remove browser bugs (only needed for really old browsers)
BrowserMatch ^Mozilla/4 gzip-only-text/html
BrowserMatch ^Mozilla/4\.0[678] no-gzip
BrowserMatch \bMSIE !no-gzip !gzip-only-text/html
Header append Vary User-Agent
</IfModule>
my htaccess file:
# BEGIN WordPress
<IfModule mod_rewrite.c>
RewriteEngine On
RewriteBase /
RewriteRule ^index\.php$ – [L]
RewriteCond %{REQUEST_FILENAME} !-f
RewriteCond %{REQUEST_FILENAME} !-d
RewriteRule . /index.php [L]
</IfModule>
# END WordPress
# jc start to set 301 fault page and no www.
RewriteEngine On
RewriteCond %{HTTPS} on [OR]
RewriteCond %{HTTP_HOST} ^www\. [NC]
RewriteCond %{HTTP_HOST} ^(?:www\.)?(.+)$ [NC]
RewriteRule ^ http://%1%{REQUEST_URI} [L,NE,R=301]
# jc end
RewriteEngine On
RewriteBase /
RewriteCond %{REQUEST_FILENAME} !-f
RewriteCond %{REQUEST_FILENAME} !-d
RewriteRule (.*) /404.php
ErrorDocument 404 /404.php
# jc gzip call
<IfModule mod_deflate.c>
# Compress HTML, CSS, JavaScript, Text, XML and fonts
AddOutputFilterByType DEFLATE application/javascript
AddOutputFilterByType DEFLATE application/rss+xml
AddOutputFilterByType DEFLATE application/vnd.ms-fontobject
AddOutputFilterByType DEFLATE application/x-font
AddOutputFilterByType DEFLATE application/x-font-opentype
AddOutputFilterByType DEFLATE application/x-font-otf
AddOutputFilterByType DEFLATE application/x-font-truetype
AddOutputFilterByType DEFLATE application/x-font-ttf
AddOutputFilterByType DEFLATE application/x-javascript
AddOutputFilterByType DEFLATE application/xhtml+xml
AddOutputFilterByType DEFLATE application/xml
AddOutputFilterByType DEFLATE font/opentype
AddOutputFilterByType DEFLATE font/otf
AddOutputFilterByType DEFLATE font/ttf
AddOutputFilterByType DEFLATE image/svg+xml
AddOutputFilterByType DEFLATE image/x-icon
AddOutputFilterByType DEFLATE text/css
AddOutputFilterByType DEFLATE text/html
AddOutputFilterByType DEFLATE text/javascript
AddOutputFilterByType DEFLATE text/plain
AddOutputFilterByType DEFLATE text/xml
# Remove browser bugs (only needed for really old browsers)
BrowserMatch ^Mozilla/4 gzip-only-text/html
BrowserMatch ^Mozilla/4\.0[678] no-gzip
BrowserMatch \bMSIE !no-gzip !gzip-only-text/html
Header append Vary User-Agent
</IfModule>